
Getting Started for TPPs (Sandbox) 6 min read
A guided walkthrough that takes you from a freshly onboarded sandbox application to a successful end-to-end payment, using the Postman collection and the included O3 sandbox utilities.
Before you start
- You are onboarded to the sandbox Trust Framework. If not, see Trust Framework Onboarding.
Generate a personalised Postman script
Fill in the values below using an Application (Client) you have created in the Sandbox Trust Framework.
Install, import, and configure mTLS
Install Postman
Download Postman from postman.com/downloads. Launch Postman and sign in (or create a free account).
Import the collection
- In Postman, click Import (top left).
- Select the downloaded
.jsonfile. - The collection will appear in your Collections sidebar.
Configure mTLS certificates in Postman
- Open Postman settings: gear icon (top right) → Settings → Certificates tab.
- Click Add Certificate.
- Enter the host of the LFI Discovery URL, e.g.
*.altareq1.sandbox.apihub.openfinance.aeor*.[LFI CODE].preprod.apihub.openfinance.ae. Leave port blank (defaults to 443). - Attach CRT:
client_transport.pem. - Attach KEY:
client_transport.key. - Save the certificate entry.
Test by registering
Send a request to the TPP's registration endpoint. A
204 (No Content)response confirms the certificate is correctly attached.
Postman Registration Request Note: if you are testing multiple LFIs in sandbox/pre-prod you may need to change the host in the Add Certificate step.
An end-to-end Single Instant Payment in the sandbox
Prepare the requests for /par
Navigate to the Auth Flow folder within Single Instant Payment and run the three O3 utility requests in order:
- Send O3 Util: Prepare Encrypted PII — encrypts the PII payload required for the consent.
- Send O3 Util: Prepare Request Object JWT — builds the signed request object for the
/parcall. - Send O3 Util: Prepare Private Key JWT — creates the client assertion used for authentication.
Stage the consent and redirect to the LFI
- Send the POST
/parrequest to stage the payment consent. - Click Visualize in the Postman response panel — this renders the response as a clickable redirect link.
- Copy the link and open it in a browser to start the authorization redirect to the LFI.
- Send the POST
Authenticate and authorize
- Authenticate with the LFI.
Model Bank Credentials (v2.1)If you are using the Model Bank, the sandbox credentials are:
Username Password [email protected]PIX- Select the account to debit and authorize the payment consent.
Exchange the authorization code for a token
After the LFI redirects back to your
redirect_uri, the URL will contain acodequery parameter.- Copy the
codevalue from the redirect URL. - Set it as the
authorizationCodecollection variable in Postman. - Send the token request to exchange the code for an access token.
- Copy the
Initiate the payment
Navigate to the Payments folder and run the O3 utility requests, then submit the payment:
- Send O3 Util: Prepare Encrypted PII — encrypts the payment PII.
- Send O3 Util: Prepare Request Object JWT for SIP — builds the signed request object for the payment.
- Send POST
/payments.
A
201response confirms the payment was successfully initiated.Retrieve the Payment ID and status
Decode the JWT received in the POST
/paymentsresponse to retrieve thePaymentIdandStatus. The status will typically start asPending.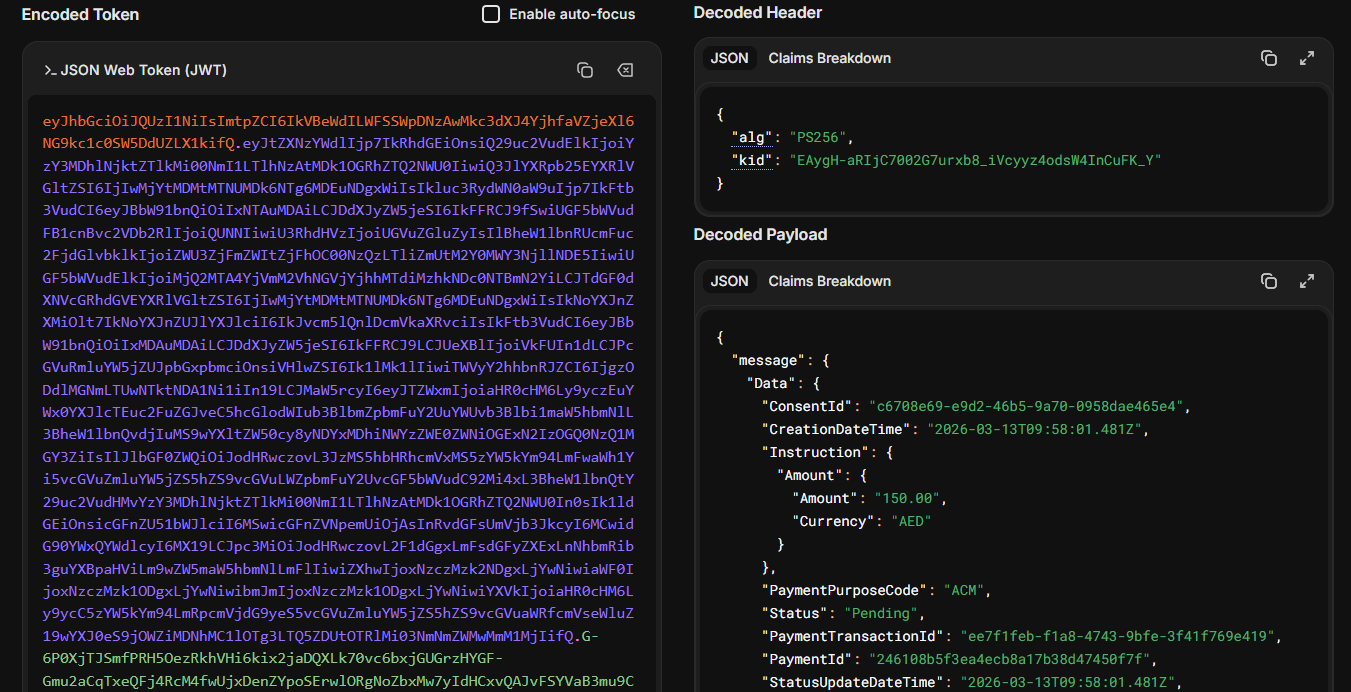
Decoded payment response JWT showing PaymentId and Status